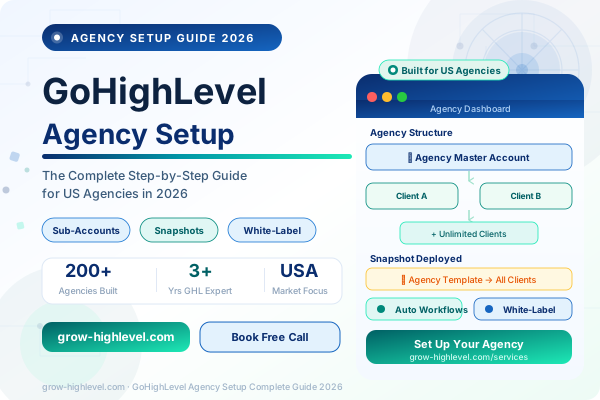
GoHighLevel Agency Setup: Complete Step-by-Step Guide for US Agencies (2026)
Setting up GoHighLevel for an agency is a different challenge than setting it up for a single business. You are not just configuring one CRM and one funnel — you are building an infrastructure that needs to support multiple clients simultaneously, scale cleanly as you grow, and run consistently without requiring you to rebuild everything from scratch each time a new client comes on board.
When done correctly, a GoHighLevel agency setup becomes one of the most valuable operational assets your business can own. Done wrong, you end up with a messy collection of disconnected sub-accounts, inconsistent automations, and a client management system that creates more work than it saves.
This guide walks you through the complete GoHighLevel agency setup process — from account configuration and snapshot creation to white-label setup and client onboarding. This is the exact approach our team uses when setting up GoHighLevel for agencies across the US, and it reflects three years of experience configuring 200+ agency accounts.
Why GoHighLevel Is the Right Platform for US Agencies
Before getting into the setup process, it is worth being clear about why GoHighLevel specifically suits the agency model.
Most marketing tools are built for a single business. GoHighLevel is built for agencies managing multiple clients. The entire architecture — sub-accounts, snapshot templates, agency dashboard, white-label SaaS mode — reflects this from the ground up.
For a US agency, the practical benefits are significant. You pay one flat monthly subscription and manage every client from a single login. There are no per-client fees, no contact limits, no restrictions on how many sub-accounts you create. As your agency grows from three clients to thirty, your GoHighLevel cost does not change.
The other thing that matters for US agencies specifically is time-zone-based support and compliance. GoHighLevel's SMS infrastructure complies with TCPA regulations when configured correctly, and the platform is widely used by agencies serving regulated industries like healthcare, real estate, and financial services across the US.
Choosing the Right GoHighLevel Plan for Your Agency
Before configuring anything, you need to be on the right plan.
The Unlimited plan at $297 per month is the starting point for any agency. It includes unlimited sub-accounts, the agency dashboard, API access, and snapshot templates. If you manage two or more clients, this plan is more cost-effective than the Starter plan from day one.
The SaaS Pro plan at $497 per month adds full white-label capability, SaaS resell mode, and automated client rebilling via Stripe. If you want to build a recurring software revenue stream by charging clients for access to your branded platform, this is the plan you need.
For a complete breakdown of what each plan includes, see our GoHighLevel pricing guide.
How to Set Up GoHighLevel for Your Agency
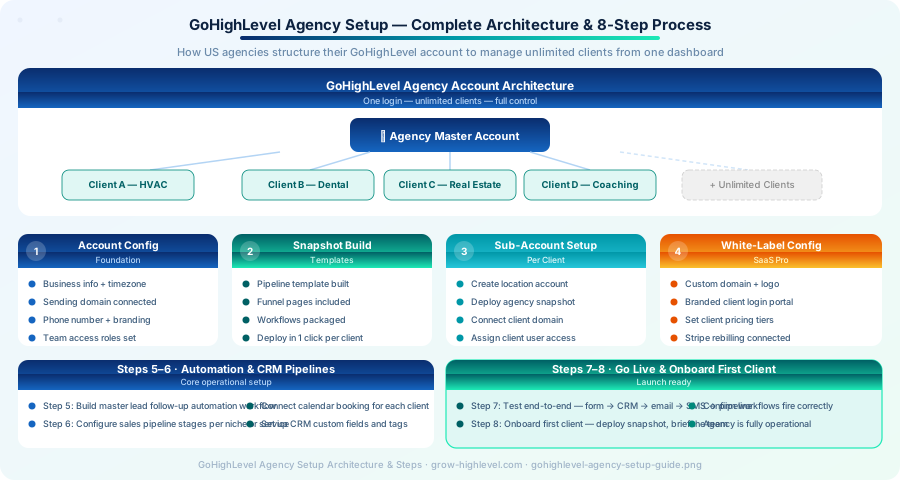
Step 1 — Configure Your Agency Master Account
Your agency master account is the top-level account from which you manage everything. It is not a client account — it is your agency's operating dashboard. Every client sub-account sits underneath it.
Go to Settings inside your GoHighLevel account and complete the following:
Set your business name, logo, and time zone. Your time zone should match your primary operating location. Since you are running a US agency, this matters for automation timing — your follow-up sequences need to fire during business hours in your clients' local time zones, not at 3 AM.
Connect your agency email sending domain. This domain is used for all outbound emails from your account. A properly configured sending domain improves deliverability across all your client accounts and prevents emails from landing in spam.
Add your phone number through the Phone Numbers section. For US agencies using GoHighLevel's SMS capabilities, ensure your number is registered and TCPA-compliant before building any automation that includes text messages.
Set up team member access with appropriate permission levels. Your account manager needs different permissions than your ad specialist or funnel builder. Configuring roles correctly from the start prevents accidental changes to live client accounts.
Step 2 — Build Your Agency Snapshot
This is one of the most important steps in the entire GoHighLevel agency setup, and one that most agencies either skip or do wrong.
A snapshot is a pre-built template that packages your standard pipeline stages, automation workflows, funnel pages, calendar settings, and custom fields into a single deployable file. When you onboard a new client, you deploy the snapshot into their sub-account and their entire system is set up in minutes rather than days.
Think about the time savings. If you spend six hours configuring a new client account manually, and you onboard twenty clients per year, that is 120 hours of setup work. With a well-built snapshot, that same 120 hours drops to roughly ten hours — because each deployment takes 30 minutes instead of six hours.
To build your snapshot, go to Settings → Snapshots → Create Snapshot. Build your standard pipeline inside a test sub-account first, then snapshot that account once everything is configured and tested. Your snapshot should include your primary sales pipeline, your lead follow-up automation workflow, your booking calendar template, your standard funnel pages, and your custom fields and tags.
Step 3 — Set Up Your GoHighLevel Sub-Account Structure
Each client in your GoHighLevel agency setup gets their own isolated sub-account. Their contacts, pipelines, funnels, automations, and conversations are completely separate from every other client. You manage them all from your agency dashboard with one login.
Go to your Agency Dashboard → Add Location. Enter the client's business name, address, and time zone. Assign a GoHighLevel user to the account if the client will have their own login.
Once the sub-account is created, deploy your agency snapshot. Select the snapshot you built in Step 2 and deploy it to the new location. The pipeline stages, workflows, and funnel pages you built into the snapshot will populate immediately.
Then customise for the specific client. Update the pipeline stage names if the client uses different terminology. Adjust the email copy in the automation workflows to match the client's brand voice. Connect the client's custom domain for their funnel pages.
For a detailed walkthrough of configuring the CRM inside each sub-account, read our GoHighLevel CRM setup guide.
Step 4 — Configure GoHighLevel White Label (SaaS Pro Plan)
If you are on the SaaS Pro plan, white-label configuration is the step that transforms your agency from a service business into a software company.
White-label setup involves connecting your custom domain, uploading your agency logo and brand colors, and configuring your branded login portal. When clients log in, they see your company name on every screen — not GoHighLevel's. The platform is powered by GoHighLevel underneath, but the entire client-facing experience is your brand.
Go to Agency Settings → White Label → follow the domain connection process. You will need to update DNS records at your domain registrar to point to GoHighLevel's servers. DNS changes typically take 15–30 minutes to propagate.
Next, configure your SaaS pricing tiers. These are the plans your clients subscribe to when accessing your branded platform. Most US agencies set up three tiers — Basic, Pro, and Agency — with monthly prices ranging from $97 to $497 depending on features included.
Connect Stripe for automated client billing. Once connected, GoHighLevel charges your clients automatically each month and deposits the revenue into your Stripe account. You never need to manually invoice a client for software access.
For a deeper dive into white-label configuration, see our complete GoHighLevel white label guide.
Step 5 — Build Your Core Agency Automation Workflows
Every sub-account needs automation, but your agency needs its own master workflows that you can snapshot and deploy consistently.
The minimum automation setup for any US agency's GoHighLevel account includes three workflows built at the master level and packaged into your snapshot.
The lead follow-up workflow fires the moment a new lead submits any form. It sends an immediate welcome email, waits 30 minutes, then sends an SMS follow-up. If the lead replies, the workflow detects the response and moves the contact to the Contacted stage in the CRM pipeline automatically.
The appointment reminder workflow fires when a contact books a call through the GoHighLevel calendar. It sends an email confirmation immediately, an SMS reminder 24 hours before the call, and a final SMS one hour before. No-show rates for US agency clients using this workflow drop significantly compared to manual reminder systems.
The re-engagement workflow targets leads that have not responded after the initial follow-up sequence. It fires after three days of silence with a different-angle SMS, then follows up with a final email after seven days. Contacts who still do not respond are tagged as Cold Lead and moved to a long-term nurture list.
Step 6 — Configure Sales Pipelines for Each Niche
One of the advantages of the sub-account structure is that you can configure each client's pipeline to match their specific sales process rather than forcing everyone into a generic template.
An HVAC company has a different sales cycle than a law firm or a real estate agent. Within your snapshot, build a general pipeline that covers the universal stages — New Lead, Contacted, Appointment Booked, Proposal Sent, Closed Won, Closed Lost — then customise the stage names and deal values for each client's niche when you deploy.
Set monetary values for each stage in every client pipeline. This gives you a live revenue forecast across all client accounts that you can review from your agency dashboard, and it gives clients a clear picture of their pipeline value during monthly reporting calls.
Step 7 — Integrate Client Tools and Ad Platforms
Most US agency clients are running paid advertising on Facebook, Google, or both. Connecting these platforms to GoHighLevel ensures that every lead from every source flows directly into the CRM without manual input.
Go to the sub-account Settings → Integrations and connect Facebook Leads, Google Ads, and any other traffic sources the client is using. When these integrations are active, GoHighLevel creates a contact record for every new lead automatically and triggers the appropriate workflow.
For clients using Stripe for their own payment processing, connect Stripe inside their sub-account so GoHighLevel can track purchase events and trigger post-sale automations like onboarding sequences or review request workflows.
Step 8 — Test Everything and Onboard Your First Client
Before handing any sub-account to a client, run a complete end-to-end test. Submit a form as a test lead and confirm the contact appears in the correct pipeline stage. Verify the welcome email arrives within seconds. Check that the SMS follow-up fires after the correct delay. Book a test appointment and confirm the reminder sequence triggers correctly.
Once the test passes cleanly, create the client's user account inside their sub-account, set their permissions, and walk them through the platform in a 30-minute onboarding call. Show them how to view their pipeline, how to see incoming conversations, and how to interpret the basic dashboard reports.
Clients who receive a structured onboarding experience are significantly less likely to churn in the first 90 days. The platform does a lot — clients who understand what to look at retain their subscription because they can see the value clearly.
Common GoHighLevel Agency Setup Mistakes to Avoid
Not building a snapshot before onboarding clients is the single biggest time sink for new agencies. Every hour spent manually recreating the same pipeline and automation setup across client accounts is an hour that should have been spent building once and deploying many.
Configuring automation workflows inside a live client account rather than a test account risks sending real leads accidental or broken messages. Always build and test in a dedicated testing sub-account before deploying to a live client.
Skipping white-label configuration if you are on the SaaS Pro plan means leaving significant recurring revenue on the table. If your clients are paying you for marketing services, they are also paying you for your systems and infrastructure. White-labelling your platform formalises that value and creates an additional monthly revenue stream.
Not setting time zones correctly per sub-account causes automation messages to fire at the wrong hours. A lead follow-up SMS that arrives at 6 AM local time reflects poorly on your agency and on your client's brand.
Getting Your Agency Setup Done Professionally
A properly configured GoHighLevel agency setup is one of the most valuable things you can build for your business. It creates operational leverage — the more clients you add, the more efficiently your systems work, not the other way around.
If you want the setup handled correctly by an experienced team without the weeks of trial and error, our team at Grow HighLevel offers a complete done-for-you agency setup service. We build the entire infrastructure — master account configuration, snapshot creation, sub-account setup, white-label branding, and automation workflows — and hand it over fully tested.
You can also hire a GoHighLevel expert from our team for a specific part of the setup, or book a free strategy call to discuss exactly what your agency needs.
Related Articles:
GoHighLevel CRM Setup: Step-by-Step Configuration Guide for Agencies (2026)
GoHighLevel White Label: Complete Setup Guide for Agencies in 2026
© 2026 Grow HighLevel. Not affiliated with GoHighLevel™.
